CSS Selectors

CSS Selectors, this is the first thing that we will be doing and repeating throughout the CSS code.
Selectors are used to target the elements where the CSS properties should affect.
There are several ways how we can target an element and we will go through them one by one.
Universal Selector
Universal selector is given by * symbol
* {
}
What ever property we give to universal selector that property will be applied to all the elements of HTML.
HTML
<body>

    <h1>Topic: CSS selector </h1>

    <h2 class="subheading">
        Hello Everyone
    </h2>

    <p id="content">Lorem ipsum dolor sit amet consectetur adipisicing elit. Quasi autem veritatis ipsam earum sint alias expedita saepe omnis sit ea, et fugit eius. Quisquam atque soluta, esse voluptatum obcaecati, ab in temporibus ullam quasi fugit, aspernatur porro minus nemo nam illo rerum corporis fuga earum. Corporis consequatur labore suscipit fuga.</p>
    <p id="content">Lorem ipsum dolor sit amet consectetur adipisicing elit. Maiores iure corrupti iste nulla delectus, vero quis cupiditate a alias vitae. Facilis dignissimos expedita dolores deserunt dolorum enim autem vitae deleniti?</p>

    <ul class="list">
        <li class="list_item">One</li>
        <li class="list_item">Two</li>
        <li class="list_item">Three</li>
        <li class="list_item">Four</li>
        <li class="list_item">Five</li>
    </ul>

    <ul class="another-list">
        <li class="items">1</li>
        <li class="items">2</li>
        <li class="items">3</li>
        <li class="items">4</li>
    </ul>

</body>
CSS
* {
    color: red;
}
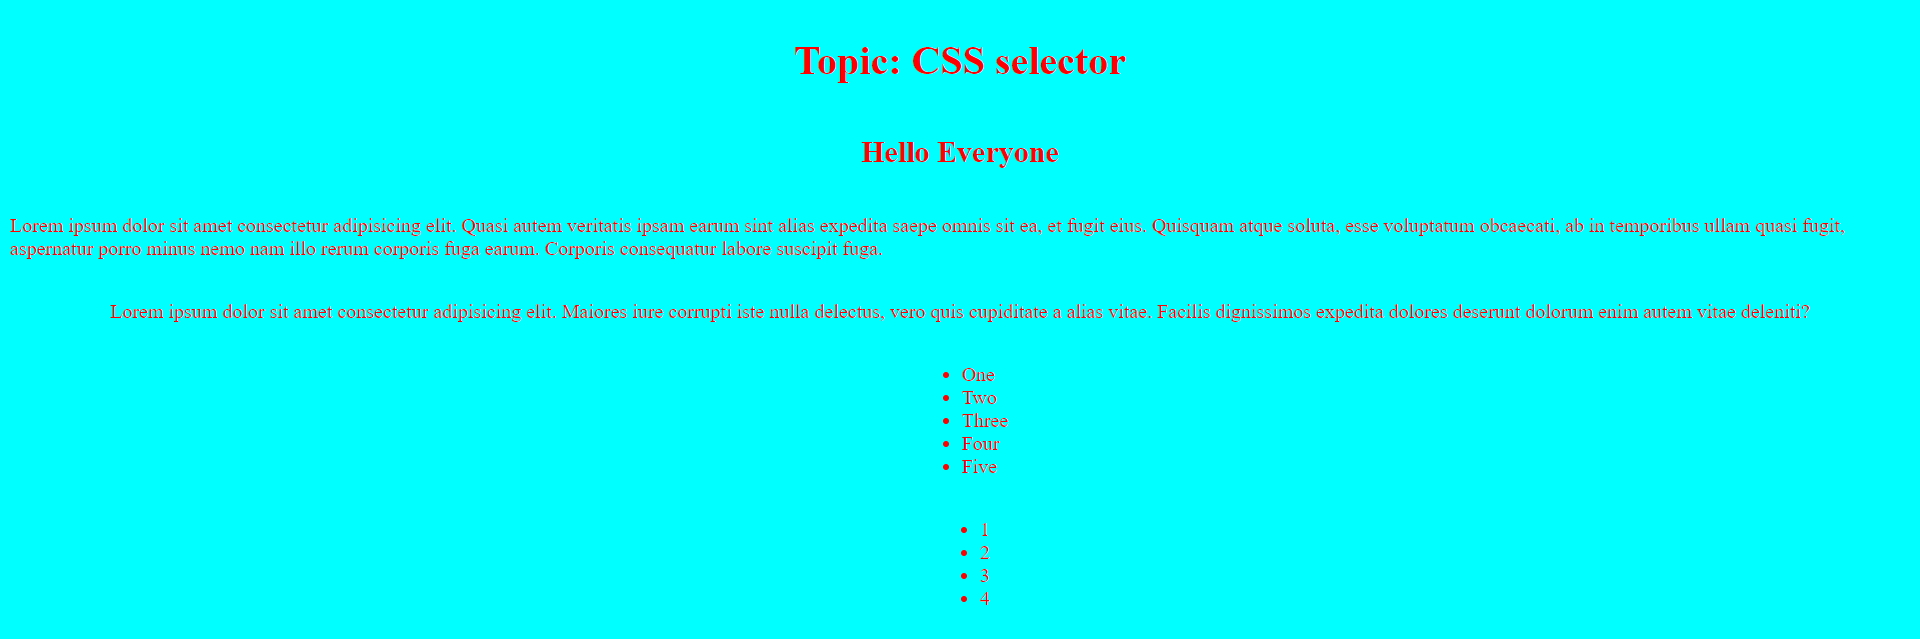
As you can see in the above image, all the elements got their font color as Red, it is because the color: red property was given to the universal selector.
Element Selector
By the use of element selectors we can use the tag name itself to target the element.
HTML:
<h1>Topic: CSS selector </h1>
CSS:
h1 {
    border: 5px solid red;
}

In the above image we can see that the text that was there in the <h1></h1> tag got red border this we achieved by targeting the element by the the tag name itself i.e. h1.
The downside of this approach is that all the tags will get the property that we pass in CSS. That means if there were multiple <h1> tags in the HTML then all would get red border.
id & class Selector
Classes and Ids are given to an element to as an attribute to make it unique from other similar elements.
Same classes can be given to multiple elements in an HTML but Id can be used only at one place thus making each element unique where id is given.
In CSS element can be targeted by class by giving . followed by class name of the element you want to target.
Similarly elements can be targeted by id by giving #followed by id of the element you want to target.
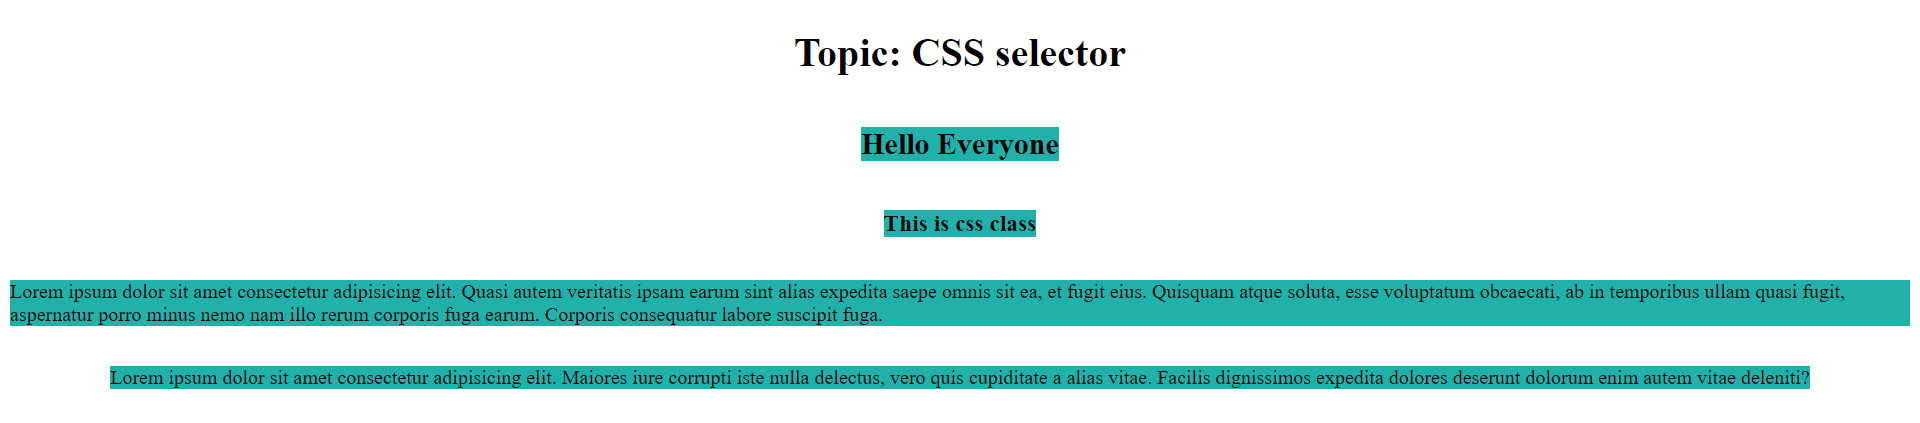
HTML
<h2 class="subheading">
    Hello Everyone
</h2>
<h3 class="subheading">
    This is css class
</h3>

<p id="content1">Lorem ipsum dolor sit amet consectetur adipisicing elit. Quasi autem veritatis ipsam earum sint alias expedita saepe omnis sit ea, et fugit eius. Quisquam atque soluta, esse voluptatum obcaecati, ab in temporibus ullam quasi fugit, aspernatur porro minus nemo nam illo rerum corporis fuga earum. Corporis consequatur labore suscipit fuga.</p>
<p id="content2">Lorem ipsum dolor sit amet consectetur adipisicing elit. Maiores iure corrupti iste nulla delectus, vero quis cupiditate a alias vitae. Facilis dignissimos expeditadolores deserunt dolorum enim autem vitae deleniti?</p>
CSS
.subheading { /*class selector*/
    background-color: lightsalmon ;
}

#content1 { /*id selector*/
    background-color: lightgreen;
}

#content2 { /*id selector*/
    background-color: lightskyblue;
}

In the above image we can see that the headings have orange background as class="subheading" is given to both the element and in CSS we are targeting by .subheading selector.
similar is the case for the two paragraphs, we are targeting ids id="content1" and id="content2" by #content1 and #content2 and the respective properties are applied to the targeted element.
Class and Id selectors are the most commonly used selectors because these are custom made by the programmer and can be used very effectively to target each element in an HTML.
Grouping Selectors
We can group element or class/id selectors by giving a , between them in CSS.
HTML
<h2 class="subheading">
    Hello Everyone
</h2>
<h3 class="subheading">
    This is css class
</h3>

<p id="content1">Lorem ipsum dolor sit amet consectetur adipisicing elit. Quasi autem veritatis ipsam earum sint alias expedita saepe omnis sit ea, et fugit eius. Quisquam atque soluta, esse voluptatum obcaecati, ab in temporibus ullam quasi fugit, aspernatur porro minus nemo nam illo rerum corporis fuga earum. Corporis consequatur labore suscipit fuga.</p>
<p id="content2">Lorem ipsum dolor sit amet consectetur adipisicing elit. Maiores iure corrupti iste nulla delectus, vero quis cupiditate a alias vitae. Facilis dignissimos expeditadolores deserunt dolorum enim autem vitae deleniti?</p>
CSS
h2, .subheading, #content1, #content2{
    background-color: lightseagreen;
}
In the above example we can see that multiple element are targeted by separating them with , and the property that is pass is applied to all the targeted elements.
Chaining Selectors
Chaining selectors gives us the ability to do target any element precisely. For example if there is a list element that we need to target but no id or class is given to it then by targeting it through the Element selector i.e. <li> it won't do the job it will select all the <li> that are not required to be targeted, in such scenarios we chain the selectors.
Chaining is done by writing the selectors separated by a space
HTML
<ul class="list">
        <li>One</li>
        <li>Two</li>
        <li>Three</li>
        <li>Four</li>
        <li>Five</li>
    </ul>

    <ul class="another-list">
        <li>1</li>
        <li>2</li>
        <li>3</li>
        <li>4</li>
    </ul>
CSS
.list li {
    background-color: lightskyblue;
}
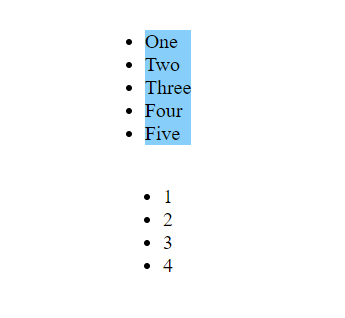
In the above example only the <li> elements that were inside the class="list" got targeted. In such scenarios precision targeting plays its role and for that chaining the selectors is done.
Grouping selectors with > sign
parent_element > child_element this selector is used when we want to target an element with a specific parent. It can be also called as Parent-Child selector.
In other words it will select only the direct child element, not like the chaining selector that we just read above in which the child element will get targeted even if it is not the direct child. We will be able to understand more by an example.
HTML
<div class="container">
        <ul class="list">
            <li>One</li>
            <li>Two</li>
            <li>Three</li>
            <li>Four</li>
            <li>Five</li>
        </ul>
    </div>

    <div class="container2">
        <ul class="list2">
            <li>1</li>
            <li>2</li>
            <li>3</li>
            <li>4</li>
        </ul>
    </div>

    <div class="container3">
        <ul class="list3">
            <li>Mon</li>
            <li>Tue</li>
            <li>Wed</li>
            <li>Thu</li>
        </ul>
    </div>
CSS
.container li {
    background-color: lightgreen;
}

.container2 > li {
    background-color: lightcoral;
}

.container3 > ul > li {
    background-color: lightpink;
}
In the above example we can see that for the class="container1" we did normal chaining .container li so even though <li> is not the direct child of the container class still it got targeted.
But for class="container2" we did .container2 > li and as <li> is not the direct child of container2 class it did not target it.
And for class="container3" we targeted through the perfect parent child order like .container3 > ul > li thus it targeted the <li> elements perfectly.
Sibling Selector ~, +:
~ Selector
HTML
<div class="container">
        <ul class="list">
            <li>One</li>
            <li>Two</li>
            <li>Three</li>
            <li>Four</li>
            <li>Five</li>
        </ul>
        <h6>Heading 1</h6>
        <h6>Heading 2</h6>
        <h6>Heading 3</h6>
        <h6>Heading 4</h6>
    </div>
CSS
.list ~ h6 {
    background-color: lightgreen;
}
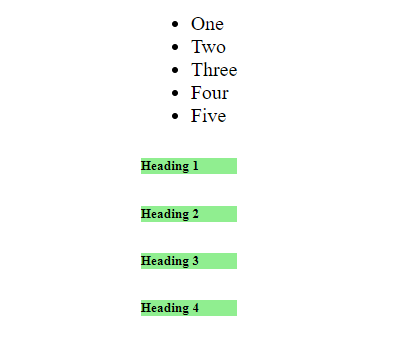
In the above example selector is .list ~ h6
The ~ selector selects all the <h6> elements that are sibling of list class and comes after the class="list" element.
+ Selector
HTML
<div class="container">
        <ul class="list">
            <li>One</li>
            <li>Two</li>
            <li>Three</li>
            <li>Four</li>
            <li>Five</li>
        </ul>
        <h6>Heading 1</h6>
        <h6>Heading 2</h6>
        <h6>Heading 3</h6>
        <h6>Heading 4</h6>
    </div>
CSS
.list + h6 {
    background-color: lightgreen;
}
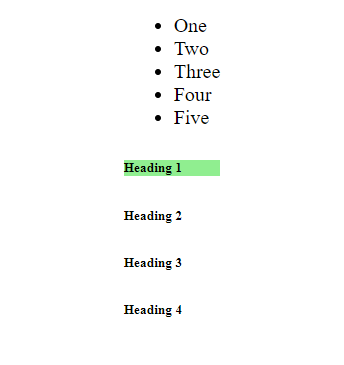
In the above example selector is .list + h6
The + selector selects the first<h6> elements that is a sibling of list class and comes after the class="list" element.
Summary
Universal Selector
* {
}
Element Selector
h1 {
}
Class & Id Selector
.class {
}

#id {
}
Grouping Selectors
.class, #id, p, h1 {
}
Chaining Selectors
Child
.class1 h1 {
}
Direct child
.class1>h1 {
}
Sibling Selectors
All sibling
.list ~ h6 {
}
only first sibling
.list + h6 {
}


